Sunday, 18 December 2011

Starting the Interior Build

It's been awhile since I've updated the blog and mostly that's because nothing has really been going on with the Barndominium except some planning.  In June and July, the exterior was built and we framed out the exterior of the "house" portion.  Since then, we've been back in Oz and busy with things there, but now it's time to get busy with the Barndominium as we're going to be back in Texas through the Christmas holidays.

During this phase of the construction, the interior walls are going to be framed, the rough plumbing will be done, a septic system will be installed and we'll get the HVAC installed.  We should be virtually ready to get the second inspection done on the house.

Since we're only going to be there a few weeks and since there's so many specialized jobs to be done, we've retained a contractor to do the framing and finish work as well as coordinating the activities of the plumber, electrician, HVAC and septic contractors to make sure it's all done right and on time.

The pictures in this blog will be the start of the framing - the first day or two of the activity after the house wall dimensions were transferred to the slab.  We'll take a lot more pictures when we arrive and those will show various other parts of the work, including the plumbing, electrical and HVAC.  We're really looking forward to this stage of the work as our Barndominium should really start looking like a house when this stage is done.


At the same time lights have been installed in the garage along with other wiring and the well pump and pressure tank have been installed and working.  Now, we have to build a "well shed" to go around the pump and protect it from the elements.


Sunday, 28 August 2011

Beekeeping Part II

The previous blog had a lot of information and pictures from the classroom and practical exercise weekend.  And while we did have more practical exercise than normal due to the rapid expansion of one of the hives we were examining, there was still a lot more practical exercise to go.  The instructor wanted the weather to be a bit warmer before opening the hives significantly, so the pictures following are about three weeks after the previous pictures.

Activities we conducted during the past weekend were:

1.  On the regular hives we had examined in the previous class exercise, we  examined the hives, made sure everything is healthy, properly structured the hives and took any remedial action necessary.  We also made sure there was a functional queen (either spot the queen or insure that there is good, recent egg formation).
2.  We built hives for two of the students who are ready to go on their own with home bee keeping.  We built these new hive boxes from two groups of bees that had been gathered by the instructor.  One was from bees gathered from a "possum box" and placed into a single hive box and the other was from bees retrieved from a barn and put into a single hive box.
3.  We examine a hive where the instructor had killed the queen (bees too aggressive) and attempted to insert a new queen.  We wanted to see if the new queen has survived and examine the hive for other "queen making" activities.


Here I am in a borrowed half suit (jeans on the bottom, bee suit at the top).  Also I have borrowed gloves.  The big problem with this outfit is that it is a bit small.  The sleeves are too short, leaving room at the top of the gloves for bees to get in.  The suit is also a bit short in the torso, meaning that when I bend over to work on the hives, I'll risk exposing some skin around the waist.  Still, I'm ready to go and start smoking the first hive we'll be working on.


And here's our team for the day.  The instructor, me and two other students.  The other two are building their first hives from some of the "captured" bees that the instructor has had on site for a couple of weeks now.  These bees have been organising their own hives, getting settled and now should be ready to be examined, organised and moved to a bee box where they'll be ready to transport after the sun goes down and the hive "goes to sleep" for the evening.


The area where the hives are located is just part of a normal suburban back yard.  The tall fence to the left and rear of the picture meets the Australian Department of Primary Industries (DPI) rules of being at least 2 meters tall (else the hive boxes must be at least 3 meters from the fence).  Given the size of the backyard, the property can only support two hives and by taking the reclaimed bees and putting them into hives that will be transported later this evening, the remaining two hives meet the requirements.


Here's one of the students, Tajn, finishing up her hive box with the last frame.  The bees have been carefully taken from the open box to the right.  This hive built from bees taken from a "possum box" that had been inhabited by a swarm of bees.  The instructor was called to help remove the bees and they were placed in a hive box and brought back to his back yard.  During the past few weeks, the bees have built up their hive nicely within the new frame boxes and are now being relocated to another box for transport to their new home.


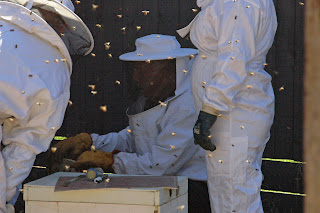
Here I am working with a group of bees that are much more aggressive than the two groups we had just transplanted into new hive boxes for transport to their new homes.  This hive is going to remain in this location but we were working to locate the queen.  The instructor had killed the previous queen as the hive was too aggressive.  His hope was that the bees would take to a new, more docile queen and that once we found her, we would mark her to make it easier to find her in the future.  This activity with two hive boxes and 16 frames, took awhile.   Since the bees were already aggressive and it took us 15-20 minutes to find the queen and mark her, the bees found the obvious flaws in my half suit and I wound up with a couple of bee stings.  One on the wrist between the suit and glove and the other right at the waist band where a been had gotten in.  It was good to discover that I still don't have much effect from bee stings.  The sting on the wrist was hardly noticed and removing the stinger quickly meant almost no sense of having been stung.  The one on the waist band was a bit more noticeable as I had to walk across the yard and get someone to remove the stinger and pull the top part of the suit down better.  Still, that took a minute and then back to work.  We did find and mark the queen and you can see in the following picture that a marked queen is really easy to find.

I really enjoyed this "bee keeping" day.  We spent about 2 hours working with the bees in a real world situation.  It is early Spring here in Australia.  The bees are very busy and there is much work to do with the hives.  We sorted out two hives, requeened one, and took two "rescued" hives, sorted them out and reboxed them for transport to their new homes.

Lesson learned:  get a very good, full length bee suit.  And one that fits properly.  A poorly fitting half suit is an invitation for bee stings.

I'll now try to get involved with one of the local bee keeping clubs and see if we can get some practical experience (yesterday was just an introduction) prior to going it alone at our homestead in Texas.  From my research on the web, the closest bee keeping club to our homestead is 35 miles or more away.  Not too far, but far enough to make sure there's probably no one around the corner who can help me out.

Beekeeping Part I

I've always been curious about bees.  And I especially enjoy honey.  Combine those facts with our five acres in a rural area along with our desire to build up a high degree of self-sufficiency and keeping bees seems like a very good idea.  Still, it does create a lot of questions:

1.  Will I like it?
2.  Could I be any good at it?
3.  Will it annoy our family/neighbors?
4.  Does it add value?

And of course, if I put it to the test of the book, Beautiful and Abundant, Creating the World we Want, I can safely say that:

1.  Is it beautiful?  Absolutely - bees are incredibly beautiful animals/insects, well organised and industrious
2.  Is it abundant?  Sure is.  You can create 150-200 pounds of honey per hive per year.
3.  Is it fair?  I believe so as long as one takes good care of the hives
4.  Is it contagious?  I hope so with respect to our family and friends in the area.  They'll certainly get a chance to share in the bounty.

Given all the background, I found a local class here in Melbourne from an organisation called Lifecycle Learning.  They teach in an urban area in a community center and have their hives right in the neighborhood.  I enrolled in this class well prior to our last trip to the US and it coincides with the end of Winter and beginning of Spring.

We spent a fair amount of time in the classroom, working with the basic elements of a hive, studying the behavior of bees and how to handle them plus the cycle of bees, the seasons, hives and other useful information.  Still, I was most looking forward to the practical elements of the class - seeing the hives, seeing how the bees build the brood, process nectar and pollen into honey and do the other "busy bee" activities they do to maintain the hive.  The following few slide show the first examination of a hive.  Recognise that this is the end of winter here and the hive should be relatively quiet and inactive.  In was even marginal as to whether one should open the hive and work with it since the temperature hasn't been too warm.  Still, it was relatively warm and certainly, there's a lot of trees and plant in bloom so it looks like Spring is starting.

The following three pictures show the instructor opening the hive and examing the frames.


What we saw was that the bees are really building brood and making honey.  All signs that it is Spring.  Also, they were making lots of cells for drone eggs - something they typically do in the early Spring as that's when the males are needed to mate with queens.

The following picture is what we saw when we opened the second hive:

Lots and lots of bees in the lid of the box.  This means the bees have run out of room, are expanding wherever they can and if this problem isn't resolved quickly, the bees will organize a swarm to get out of the current enclosure and find something larger.  Thus, even though it wasn't planned, we set about expanding the hive to insure the bees have plenty of room to expand.  This expansion is seen in the next few pictures.


Smoking the hive. This causes the bees to eat a bunch of honey quickly. They don't know if there's a fire that will make them flee but if so, they need to store as much honey as they can to survive the flight. Still, the rapid eating of a bunch of honey causes them to go into a "food coma" resulting in some slow, gentle bees.


Adding the additional box and frames so the bees have plenty of room to expand for the next few weeks.


The final result - building the hive from 2 to 3 boxes only took about 20 minutes and will give the bees adquate expansion room for at least the next few weeks.

So - did I answer my questions from the first part of this blog - definitely yes.  I enjoyed this class a great deal and now look forward to the practice of these lessons in an actual "hive day" to be held in a couple of weeks so I get a chance to suit up and work through several different things like finding and marking a queen, merging hives, dealing with bees from a "rescue operation" like getting bees from a possum box, tree or building.

Tuesday, 19 July 2011

Phase I Complete

We set out on our recent set of activities to get the Bardominium completed on the exterior.  We accomplished that goal plus also completing the very large planter along the front of the Barn.  Also, we have the camper trailer now safely parked inside the Barn and we'll be using the Barn as our base of operations for all activities during Phase II.  We'll be doing planning on the interior architecture for a few weeks now, along with slowly doing some of the electrical wiring for the garage portion of the Barn as well as setting up for the wiring of the house, once the interior framing is done.

Here's a couple of shots of the exterior, all cleaned up and tidy.


After getting the exterior of the Barn in good shape, I spent a few hours removing some of the dirt from the north side of the building and putting that in the driveway area to build it up a bit.  There's too much dirt on the north side anway, and that excess will provide good fill for the driveway.  We'll get that dirt moved at a later date.


The final few activities of Phase I were to get our camper trailer from our daugther's house over to the new garage.  As you can see from these few shots, the trailer fits extremely easily within the garage with lots of room all around for the truck and lots of other storage.


And before saying goodbye to Casa de Christie and our Texas property for a few months, we got the shop and tools all organized and clean so that when we return to another pile of lumber on the porch, we are ready to start to work immediately on Phase II.

Until then, our family and friends will be doing electrical work and getting things ready for the next phase of intense activity.

Saturday, 16 July 2011

Hi Maria

This post is a quick shout out to our friend and neighbour in Australia, Maria.  While we've been doing all the work the past three weeks, Maria has been looking after our house and cats.  Thanks Maria!


Wednesday, 13 July 2011

Finishing Work for this Trip

When we arrived back from our trip to Minnesota, we went immediately to the new house to see the work that had been done on the planter along the North side.  In these couple of pictures, you can see the first "wall" of the planter (the wall closest to the house) has been completed.  We had a small toast to this progress as it was obvious that this pla nter will become one of the features of the Barndominium and, although not part of the work plan for Phase I, certainly is one of the activities we are most please with.  Here's the pictures:


We've had a very productive 2+ weeks.  It'll be 3 weeks by the time I'm done but the majority of the visible work is done and can be seen in these pictures.  It's hard to believe that only a few weeks ago, we had a bare plot of land here and since, have improved the road to the building site, built a well, created the site for the building, poured the slab and erected the building.  Over the past two weeks, we've enclosed the "house" portion of the Barndominium, put in all the doors and windows, sealed and fixed everything to the metal building and slab and finished the painting.  The functional and decorative part that we didn't plan on doing until we were here and saw the site and what it needed was the very large native stone planter all across the north face of the building as well as 12' down each side.  That work now provides 76' of planter box (it'll take awhile just to fill it with dirt).  That'll enable us to have a wide variety of plants and vines along the east side where the morning sun is strong on the patio and some on the west side where the evening sun is really strong.  Also, there's good protection on the north side in the case of an exceptional storm in terms of providing a wall to prevent water from coming down the hill and getting up on the deck.

Also, electricity has now been pulled through the ground into the building and work is started on wiring the inside so that the next time we arrive, it'll be home sweet home for us, even though there is all the internal construction remaining on the house.  At least we'll have the camper trailer inside the barn, connected to the power, water and septic systems.


you can clearly see the planter box across the front and the west side.  Also, note the sandy color of the HardiPlank and the Periwinkle blue trim around the windows and door.

The size of the planter is more visible as well and the blue trim.  While we won't get it done on this trip, the next trip will involve putting shutters on the edge of the windows.  These shutters will be the same blue color and will add a lot more "blue" to the building - a nice contrast to the color palette of the land, trees and the building.


A good panoramic view of the west and north sides of the house.


A final view looking across from our daughter's house to the Barndominium.

Wednesday, 6 July 2011

Exterior Almost Finished

After a number of days of incredibly hot weather, we've gotten to the point of having the exterior almost finished.  All the Hardi Plank is installed and some caulked.    This picture shows Julie and I doing some of the HardiPlank installation.  It actually goes very well with the fixture that goes with the planks.  If the bottom and second course are installed very level and properly, you can then use the fixture (as seen in this picture) to install the subsequent courses.  As a result, the planks are installed in a very level fashion and fit beautifully.

We're leaving for a couple of days to visit other family in Minnesota (and hopefully cooler weather).  That will be a welcome break from both the 10 hour days and the 100 degree heat.  Here's the status as of today.


Julie's doing a little clean up along the front of the house.  That area on will be built up with a large planter box - some of which will be done while we're gone to Minnesota.  You can barely see some of the sample stone in the left middle of the picture.  The entire 52' front plus 12' down each of the east and west side will be where the planter goes.  I'm eager to see how much progress they make while we're gone.

We also went and procured all the electrical equipment and lots of wiring (much more expensive these days) to bring power into the Barndominium.  That should also be well underway while we're gone.


We are very grateful to all the family and friends who have helped us get to this point in 9 days on location.  We'll have a week when we get back to get the final caulking done (the color you see is just the primer) and get the final painting done on the house.

Monday, 4 July 2011

Building the Barndominium

We've been here in Texas for a week now and are making substantial progress on the Barndominium.  The first day here was spent setting up the shop in the garage portion.

Notice the open walls.  That's where we'll be building out the walls starting tomorrow.


Going from having the sticks up to getting everything absolutely secured from the slab to the steel beam above the studs took another day or two and then we put up the sheathing and weather coating.


So now it's starting to look like a real house.  The windows are in.  The door is not and the final weather protecting paper isn't installed at the top of the sheathing, but the following day, it's all ready for putting the final covering on - the Hardi Plank.  Here's a picture just prior to Hardi Plank.


Finally, here on the 4th of July, we worked about half a day starting the Hardi Plank.  Here's the fruits of our labors:


 A huge thanks to Joel (second son) who spent the better part of the week with us.  Without him, we would never have gotten this far nor would we have created something as sturdy and attractive as we have.  Thanks Joel!

The next couple of days, we'll be completing the Hardi Plank.  There's caulking to do and then painting the exterior to match the building.  The colors now (a brown and an unattractive yellowish color) are only the natural primers on the Hardi Trim and the Hardi Planks.

It's been a very vigourpous week and a day.  The last two days  have been pretty easy - fairly much a half day on Sunday and the 4th, but it's back to full days tomorrow and Wednesday.

Friday, 24 June 2011

Last Day of the Construction (Day 10)

After a very productive day yesterday, all the was left was putting the very large overhead doors into the garage portion of the barn.  They'll finish that today and all just in time as I'll leave for the airport in an hour or so and be there late tomorrow.

Tomorrow when I get there, it'll be pretty late at night, so just time to say "hi" to everyone, have a nice glass of wine out on the deck and then find a bed.  It'll be about 32 hours from now getting there so a very long day.   When we get going Sunday morning, Bob already has the tractor setup with a large trailer backed up to his garage so that we can load every conceivable tool we'll need for the next three weeks as we build out the outside walls of the house.

Don't you just love those old classic Ford 8N tractors?  I think that one is Bob's but mine is almost identical so they're a little hard to tell apart.  Getting excited now for the trip.

Thursday, 23 June 2011

Day 9 of the Construction of the Building

The shell of the building is virtually done.  The walls are completely up and you can see that when these pictures were taken, there was only a little of the ceiling left to cover.  I'm sure that by the end of the day, they will be completely done with everything but mounting the large overhead doors.  The opening for these doors is clearly seen in the pictures.
Nice view looking through a nice grove of trees toward the west side of the building
Inside of the building - looks like an airplane hangar right now

The workers' truck uses our porch for a carport

East wall of the building.  Plain Jane but not a common view

East wall from the northeast.  Decent view

The previous few pictures were taken around 9 AM so they made good progress at the end of day 8 and early on day 9 to get the roof almost done.  You can see in the following picture taken after lunch that they are down to tiying up the construction (see the worker on the roof of the porch).  Also, note that the local doves have taken up a perch on the porch - like the building is now theirs to sit on.


These may be the last pictures I post prior to flying to the US.  I'm out of the house within 24 hours.  The Chilean volcano ash is still acting up in the area, so let's hope that we can fly in the morning.  Right now, all the mainland Australian airports seem clear but the ash is hovering over Tasmania and NZ.  Air NZ (with whom I'm flying) has been flying all along during the ash problems, so let's hope they don't have a change of heart.